Your role as a Patient Partner
As you have been learning, your role as a Patient Partner is to show doctors the system you have been taught for assessing musculoskeletal problems effectively and efficiently by using the three consultation principles of the history taking, the screening assessment and the principles of joint examination.
Before your presentation, you will introduce yourself and give an explanation of the session. Develop your own script with your trainer. This will include your personal introduction and a description of your problem and history so that you can respond to questions the doctor should ask you during the demonstration.
Throughout your demonstration, you need to include information at appropriate and relevant points about your own personal and individual disease experiences and findings. Having first-hand experience of the condition being discussed gives you insight that you can use to help doctors learn about musculoskeletal conditions; this is what makes Patient Partners so unique.
If questioned about the technique you use, mention that this is the way you have been taught to perform an examination of the musculoskeletal system, but accept there may be variations in technique between different hospitals, clinics or surgeries.
The following pages should enable you to see how the information you have read/studied so far in the Patient Partner manual is to be used and translated into the training sessions. A Patient Partner demonstration follows the order:
- Introduction to self and Patient Partner programme.
- An introduction and explanation of the session including its aims
(this is now called in educational terms the “learning objectives”).
- The principles of history taking (Introduction script).
- Principles of examination (Introduction script).
- The screening assessment (Introduction script and then practical demonstration).
- Demonstration of the assessment of a specific joint.
NB. Patient Partners will be guided on which joints they will study/demonstrate.
Introduction to self and the Patient Partners programme
“Good morning/afternoon. My name is … [insert your name] and I would like to welcome you to the Patient Partner programme and thank you for attending this session today.”
“First, I’d like to tell you a little bit about Patient Partners. The programme is run in 22 countries around the world with over 600 Patient Partners who, like me, are all people with arthritis. We’ve all been specially trained to work with *doctors / *medical students / *nurses /
*physiotherapists / *occupational therapists [*only mention those represented in your audience] to provide you with practical and hands-on training in conducting a musculoskeletal examination.”
Some of what we cover today you may already know, but what we as Patient Partners uniquely offer you with this programme is the benefit of our experience of living with our condition – and this is something you won’t find in your textbooks! This is an interactive session, so please do join in and ask me questions as we go along – that’s what I’m here for.”
*I’d also like to mention here that this programme is accredited by / is recognised by XXX [*mention here any national accreditation / international recognition] so by attending you will receive XXX accreditation.
**********************************************************************************************************************
The point of this section is to introduce yourself to participants and to give a brief background. Do not give your complete history at this point. Remember you are teaching the doctors by role playing with them as if you were a new patient and helping them to arrive at an accurate diagnosis and understanding of how this affects you. This will not be so valuable to the doctor (nor as much fun for you!) if you start by telling them up-front what your condition is.
**********************************************************************************************************************
Introduction and explanation of the session
“You may be wondering why you might need additional training in arthritic conditions. Around one in five people in the world has arthritis, which affects people of all ages and is the most common form of long- term physical disability, which means you’re very likely to see a large number people with arthritic conditions in your medical practice.”
“There are over 200 different types of arthritis, the two most common being rheumatoid arthritis and osteoarthritis. There are now effective ways of treating many arthritic conditions, but for some, like rheumatoid arthritis, early diagnosis is particularly vital for successful management.”
“Today we are going to work through a typical consultation together using me as your patient, looking at history taking, and a physical joint examination and also a screening assessment. You will be provided with Fact Sheets with details of all the information you need to conduct a comprehensive consultation in practice at the end of this session.”
“Although my condition has been diagnosed, I’m not going to tell you about it at the moment. I want you to treat me as a new patient who has just walked into your consulting room and as we work through the examination together, I want you to find out as much as you can about my condition.”
“As a new patient I am going to present to you with a problem, which I hope you are going to be able to help. You, as a doctor / *nurse etc. [as appropriate to your audience] want to identify the cause of my problem, assess the impact it is having on my life and consider various treatment options, which you will then discuss with me, the patient.”
“As you will probably have limited time for the consultation, good communication is going to be very important. I, as a patient, will have concerns about my problem, which I would like to have answered in the consultation. The sort of things I will want to find out are:
- ‘What is wrong?’
- ‘What will happen to me?’
- ‘What can you (the doctor) do about it?’
- ‘What can I do about it?’
- ‘Will I get better?’
- ‘Will I get worse?’”
“You, as the health professional, will need to gain a clinical understanding of the problem. You might want to know:
- ‘What is the cause of the problem?’
- ‘Is there an abnormality? If there is,
– What is it’s character?
– What is it’s effect?
– What is the cause?’
- ‘Are there any predisposing risk factors to having the problem, such as obesity, lack of exercise, smoking, family history of the condition, or other illnesses such as psoriasis?’
- ‘Are there any complications?’
- ‘What are the physical and psychological impacts of this condition on my patient?’
- ‘What is the response to treatment?’
“The ‘mock consultation’ process we will go through today is designed to help you obtain the information you need, as well as answering my questions as a patient.”
“So, let’s first consider the information you need to get from a consultation to meet both our needs.”
The principles of history taking
This script is designed to be interactive, so you can ask the doctors/medical students etc. what sort of questions they might ask a patient. They do not need to mention every single question, but if they do not respond, or leave out any important questions, you can prompt them by saying, “You could have asked me about…”
As this script is about the principles of history taking, so you do not need to go into detail about your history here. This will come later when you go through your mock consultation in your demonstration.
**********************************************************************************************************************
“Taking a good history will form an important part of your consultation. To be able to understand the problem, you need to ask a number of questions.”
“First of all, what sort of questions might you ask at the beginning of a consultation?”
“It is important to get a clear description of my problem.” “The normal questions are:”
- What’s the problem? (Not, ‘How are you?’)
- What are the characteristics of the symptoms? (For example, pain, loss of function, stiffness weakness/giving way of a joint, swelling or joint deformity)
- Where are the symptoms (the site/s) and do the symptoms have a pattern?
- Over what time scale have the symptoms developed and in what order did they appear?
- Are there any associated symptoms? (Such as fever, loss of energy, depression, sleep disturbance, weight loss, rashes etc.)
- Have there been any interventions, including medications, which alleviate these symptoms?
- Are there any factors that have preceded, or precipitated these symptoms? (Such as any illness or injury)
“To get further information to help make a diagnosis you should also know about:”
- My general health – am I in good health and/or are there any other medical conditions I might have?
- My lifestyle – exercise, diet, smoking etc.
- My past history
- My family history
“Musculoskeletal conditions can be very debilitating, so you might want to ask further questions about how my symptoms are affecting my everyday activities. This will give you a more comprehensive insight into my condition and the impact this has on my quality of life.”
“What sort of questions might you ask me about how my symptoms affect my lifestyle?”
Usual questions and possible prompts:
- My situation at home and work – tasks I need to do at home and at work, my role in the family, carers etc.
- My self-care – washing, dressing, feeding myself and going to the toilet?
- My ability to carry out domestic tasks – cooking, cleaning, doing the laundry and shopping?
- My work – standing, sitting, specific difficulties, time lost from work
- My leisure interests – walking, going out for meals or playing sports?
- My expectations
“So, it’s important not to just think about my condition in terms of pain or loss of movement, but to understand how my condition can restrict my activities and how I participate in normal life.”
“Once you have a clear understanding of my problem, you will then need to examine me to establish the nature and cause of the problem. We will now move on to the principles of examination before starting the practical demonstration.”
Principles of examination
This script covers the principles of examination. The doctors/medical students will be able to fully put these into practice when you conduct your demonstration in the mock consultation.
“First, before you start a joint examination, ask if there are any painful areas, including pain from daily activities, and watch your patient’s face for signs of discomfort during the test. Tell the patient to let you know if you are, or are likely to, hurt him or her.
“A joint examination should be performed systematically. Always assess and compare both sides of the patient’s body. There are five steps to a joint examination and these are:
- Look
- Feel
- Move
- Stress
- Listen
In addition to these there may be other tests to help with specific diagnosis.”
“First, what would you look for?
[You can demonstrate the next section on yourself]
- Demeanour/walk/sitting/standing
- Inspect joints at rest and in movement
- Swelling or redness
- Soft tissue changes
- Loss of symmetry and changes in alignment
- Rheumatoid nodules and bony changes.
Always look before you touch.”
“Secondly, Feel or palpate the joint. Feel for warmth first by running the back of your hand lightly over a normal area towards the affected joint or area in question. Then feel for tenderness by pressing with gradual increasing pressure until the person says it hurts, they flinch, or you can see discomfort register in their face – always keep a watch on your patient’s face when testing for tenderness. The maximum pressure you should exert should be sufficient to make your nails blanch before you say there is no tenderness.”
“If the patient’s joint seems very tender then obviously examine them very gently. Moving a joint can be very painful, not only in the joint you’re examining, but you could also be moving other joints that are painful.”
“You also need to feel for swelling. If there is swelling you need to characterise if it is hard or soft swelling. If it’s soft, is it soft tissue or fluid? If it’s hard, is it bony enlargement of the joint or a rheumatoid nodule?”
“Now you need to move the joint to test its range of motion with active or passive movement and looking at how the function of the joint is affected:
Is it painful?
- Is there a full or restricted range of movement, or does the joint move beyond the normal range into hypermobility?”
“Ask the patient to move their joint as far as they can in comfort to see how they manage [active range of movement]. Then you can gently move the joint and see if it will move any further [passive range of movement] – remembering the joints could be very painful. There may be times when you do these movements separately, as the active range of movement involves muscles and tendons and the passive range of movement is just moving structures. When you move a joint against resistance this can detect lesions in the tendons and test muscle power. Differences in the pattern of pain on these movements can help identify the cause.”
“When you are moving a joint you can also take the opportunity to feel and listen for sounds of crepitus.”
“Use stress tests, where the joint is physically tested against resistance, such as the examiners hand, to assess stability and establish whether stressing the joint allows movement in planes that are abnormal for that joint.”
Feedback
Once the examination has been completed the doctor should be able to make a diagnosis. Once the nature of a problem has been established it is important that there is feedback and exchange of information between the patient and the doctor. The doctor must be aware of the patient’s expectations about his or her condition and how it will progress, and the doctor must explain carefully the nature of the patient’s complaint and likely outcome. If the doctor you are training does not do this spontaneously, then you must ask appropriate questions to start up this dialogue and may even remind the doctor that the patient will want an explanation.
**********************************************************************************************************************
The inability to flex a joint is called fixed flexion deformity and the inability to extend a joint is called fixed extension deformity.
**********************************************************************************************************************
Screening assessment
Please note:
– Please DO NOT attempt to demonstrate anything that might cause you pain or any damage. Ask members of your audience to ‘volunteer’ and use them to model the movements.
– If you are unsure what moves might not be safe for you to perform, please check with your doctor or specialist first.
**********************************************************************************************************************
“Having established the principles of history taking and joint examination, we are now going to put theory into practice. First we will look at a quick screening assessment and then go more specifically into a full mock consultation that will tell you about my problem, using the principles we have just talked about.”
“First, I will show you the screening assessment.”
“The screening assessment we are going to use today is based on a validated and widely used method. The questions asked will identify if there is a problem affecting the musculoskeletal system. The movements of this assessment are the first to show evidence of problems affecting the joints or spine, so it is a sensitive test of early disease.”
“This screening assessment can be used to check over the whole musculoskeletal system as a routine check, as you might screen someone’s heart and lungs, or it can be used to investigate if someone’s problem is localised or generalised. The full screening assessment should only take a few minutes”
“To start with, as your patient enters the room, you may already have noticed they have a problem with how they move, how they look and whether they have any trouble walking. Screening questions you should ask at this stage are:
- Do you have any pain or stiffness in your arms, legs, back or neck?
- Do you have any difficulty with activities, such as washing and dressing, or in going up and down stairs?
- Do you have any swelling of your joints?
These will establish if they have any problem with the musculoskeletal system. You should also ask “How is your general health?” as many musculoskeletal problems are associated with systemic illness.”
“You may have to ask additional questions, depending on the answers you receive. For example, if the patient says they have pain, you will need to ask them to tell or show you exactly where the pain is situated in their arms, legs or back. As this is a screening assessment you would not want to ask more detailed questions at this stage.”
“When you’re doing a screening assessment you will need to tell the patient what to do and you may need to demonstrate some of the movements. You can record your findings on the screening check list provided.” [You can provide the Screening Assessment Checklist here].
“Please could I have a volunteer to help me with this demonstration?”
“First let’s look at how your patient walks without shoes on. [Observe the patient walking a few meters and then turning and walking back again].”
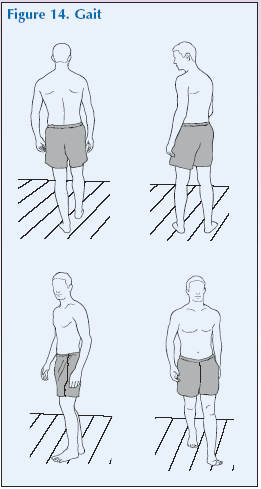
“What are you looking for?”
- Abnormalities of heel strike / stance phase / toe off and swing phase.
- Abnormalities of move-ment of arms, pelvis, hips, knees, ankles and feet during these phases.
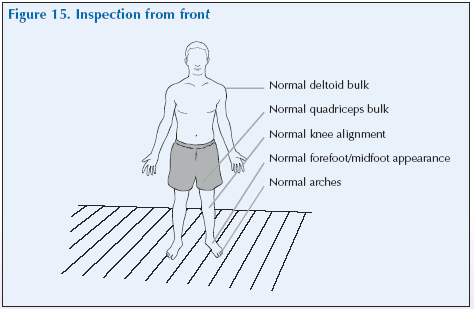
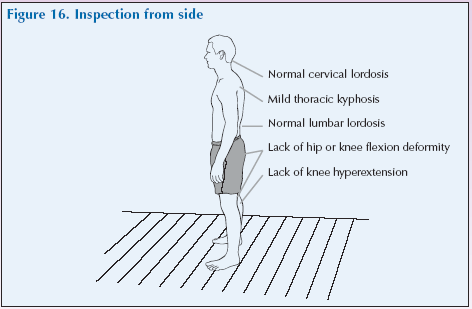
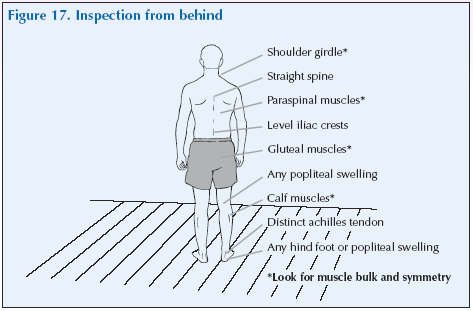
“Now ask the patient to stand to check their posture from the front, side and back.”
“Examine for tenderness by applying pressure in the midpoint of each supraspinatus and rolling an overlying skin fold.”

“What are you looking for?”
- Normal muscle bulk/knee alignment/appearance of forefoot, midfoot and arches.
- Normal muscle bulk in the gluteal and calf muscles and appreance of the paraspinal muscles.
- Alignment and positioning of the shoulder girdle, spine and the levels of the iliac crest.
- Swivel of the hind foot or popliteal area.
- Tenderness of the supraspinatus muscle.
“Ask the patient to flex their neck laterally to each side. [Touch ear to shoulder on each side].”
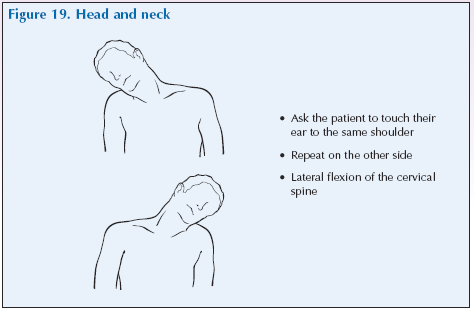
“What are you looking for?”
- Lateral flexion of the cervical spine to each side.
“To check the lumbar spine, place several fingers on successive lumbar spinious processes and ask the patient to bend forward slowly and attempt to touch their toes with their legs fully extended.”
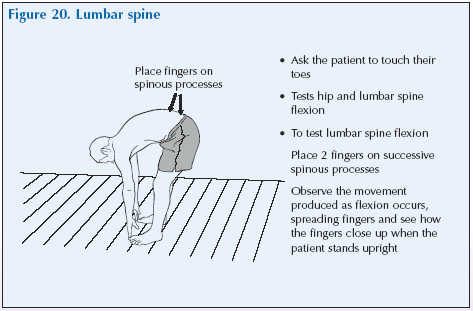
“What are you looking for?”
- Hip and lumbar spine flexion, observing and feeling for normal movement as flexion occurs.
[The patient can remain standing, or you could invite them to sit down to perform the next tests if this would be more comfortable for them.]
“Moving on to the shoulders, ask your patient to place their hands behind their head with their elbows out and to push their elbow back.”
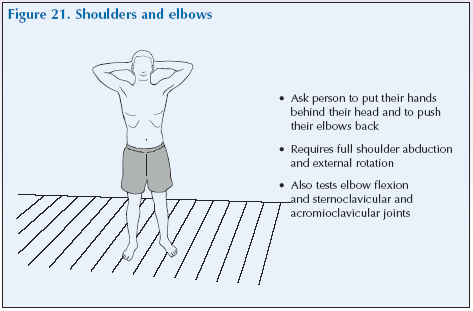
“What are you looking for?”
- Full shoulder abduction and external rotation
- Elbow flexion, steroclavicular and acomicoclavicular joints
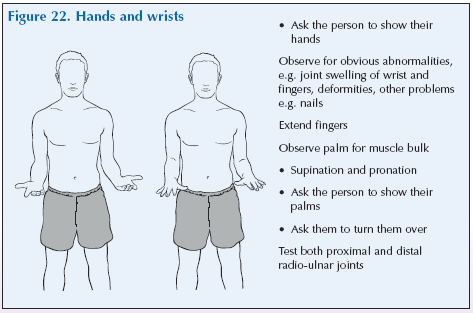
“Looking at hands and wrists, ask your patient to straighten their arms down the sides of their body and bend their elbow at a 90o angle with their palms up and fingers straight. Then ask them to turn their palms downwards and make a tight fist with each hand.”
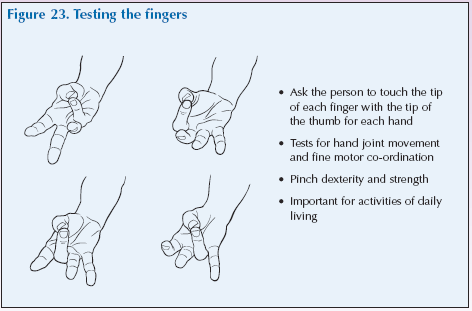
“Now ask them to touch the tip of each finger in turn with the tip of their thumb.”
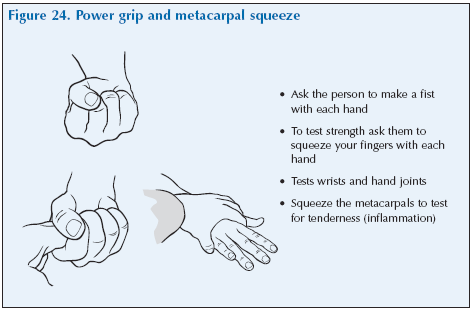
“Ask the patient to squeeze your fingers with each hand. And finally, gently squeeze the 2nd – 5th metacarpal joints.”
“What are you looking for?”
- Joint swelling of wrists and fingers, any changes, e.g. nails.
- Suprination, pronation, proximal and distal radius-ulnar joints.
- Palm muscle bulk.
- Hand joint movement.
- Fine motor coordination.
- Pinch dexterity and strength.
- Flexion of finger joints.
- Grip strength (writs and hand joints).
- Tenderness (inflammation).
“To test their hips, knees and feet, ask your patient to lie down on an examination couch. Note their ability to get onto the examination couch and inspect their legs for asymmetry and wasting.”
**********************************************************************************************************************
Please note:
If an examination couch is not available these moves can be done sitting.
**********************************************************************************************************************
“Flex and turn each hip and knee whilst holding and feeling the knee. Then passively rotate the hip internally.”

“With the leg extended and resting on the examination couch, examine for tenderness or swelling of the knee by pressing down on the patella while cupping it proximally.”

“What are you looking for?”
- Flexion of the hip.
- Flexion of the knee.
- Tenderness or swelling of the knee.
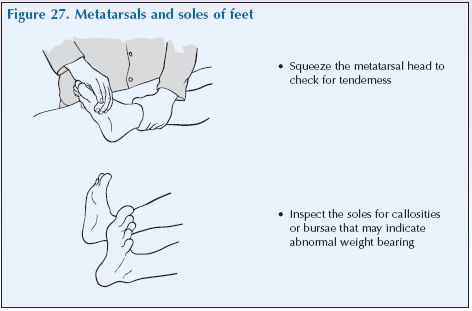
“Moving on to the feet, gently squeeze the metatarsal heads and inspect the soles of the feet for callosities.”
“What are you looking for?”
- Tenderness and callosities.
“You should now record it as shown on your screening assessment fact sheet.”
“In practice it might not be necessary to do a full screening, if your patient has specified their problem lies in one particular area. However, even if the problem is restricted to one joint, you should always test one joint above and one joint below the affected area, as pain might be referred, or another joint might be involved.”
“Do you have any questions about the screening assessment?”
Individual Problems
“With these joint examination principles in mind, we can now move on to assess certain individual joints. Today we will be reviewing the …………. joints. At each joint, we will review the relevant anatomy and discuss further specific history-taking questions. You will then have an opportunity to examine my joints whilst I guide you through the process.”
The following sections will consider musculoskeletal problems for each of the following:
- Neck pain.
- Shoulder and upper arm pain.
- Hand and wrist pain.
- Low back pain.
- Hip pain.
- Knee pain.
- Foot and ankle pain.
For each section there will be:
- An introduction.
- A description of the anatomy of the region. A pronunciation guide will be provided to help you learn the terms as you encounter them but pronunciations are also repeated in the glossary provided.
- The symptoms that a person might experience in this region.
- The possible causes of the problem.
- An explanation of the symptoms and impact on quality of life that you, the Patient Partner, may encounter because of the problem. This will help you role play giving a history.
- A script describing how the region should be examined using the techniques explained in the previous section: look, feel, move, stress, listen and special tests.
[Move into individual joint examination script/s]